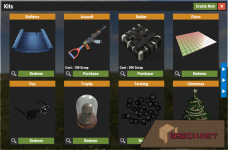
Allow your players to redeem pre-made kits of items

Once you have done that either type "/kit new" in chat, or press the "Create New" button in the top right of the UI.
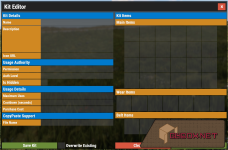
You will presented with the following screen

All the kit options are on the left hand side, and the item view is on the right.
Start by pressing the "Copy From Inventory" button in the bottom right. This will add all the items from your inventory in to the kit.
You can then proceed to fill out the information on the left side.
Kit Details
What kits are included are to be specified in the config file under "Autokits ordered by priority" by using the kits name
The plugin will loop through each kit specified in the config until it can give one to the player.
These auto-kits adhere to the same redeem rules as claiming them manually so they will be subject to things like Maximum Uses and Cooldown time
Here is a example of the formatting used in the config
Each NPC can be configured with different kits, and when the player interacts with the NPC the kit menu is presented to them with the kits specified in the config
The example in the config shows how to set this up.
You can specify which kits are available through the NPC, and a chat based response when interacting with them
The first parameter is the NPCs user ID

Features
- Easy to use UI menu for creating and claiming kits
- Set redeem limitations with maximum uses, cooldowns and purchase costs
- Create VIP kits that require custom permissions
- Create admin kits that use Rusts auth-level system
- Give auto-kits on death by specifying a list of kits in the config and have the granted using a priority system
- Works with HumanNPC to have kits that are only available via NPC interaction
- Supports CopyPaste by allowing kits to paste down pre-created structures
- Customize the UI color scheme in the config
Permissions
This plugin uses the permission system. To assign a permission, use oxide.grant <user or group> <name or steam id> <permission>. To remove a permission, use oxide.revoke <user or group> <name or steam id> <permission>.- kits.admin Players with this permission can use the admin command functionality
Commands
This plugin provides both chat and console commands using the same syntax. When using a command in chat, prefix it with a forward slash: `/`.Player Chat Commands
- /kit Opens the kit menu
- /kit <name> Used by player to claim the specified kit
- /kit autokit Allows the player to toggle whether they recieve kits when spawning. This option must be enabled in the config
Admin Chat Commands
- /kit help Show the help menu with all available commands
- /kit list Show the full list of kit names
- /kit add/kit new Start creating a new kit
- /kit edit <kitname> Start editing a previously created kit
- /kit remove <kitname>/kit delete <name> Delete the specified kit
- /kit give <player name | player id> <kitname> Give the specified player the specified kit
- /kit givenpc <kitname> Give the specified kit to the NPC you are currently looking at
- /kit reset Reset all player kit usage data
- /kit resetuses <player name | player id> <kitname> Reset the uses for the specified kit and player
Admin Console Commands
- kit list List all kits
- kit remove <kitname>kit delete <kitname> Delete the specified kit
- kit give <player name | player id> <kitname> Give the specified player the specified kit
- kit reset Reset all player kit usage data
- kit resetuses <player name | player id> <kitname> Reset the uses for the specified kit and player
How to create kits
Before starting, clear your inventory and use the admin menu to give yourself all the items you want in the kit.Once you have done that either type "/kit new" in chat, or press the "Create New" button in the top right of the UI.
You will presented with the following screen

All the kit options are on the left hand side, and the item view is on the right.
Start by pressing the "Copy From Inventory" button in the bottom right. This will add all the items from your inventory in to the kit.
You can then proceed to fill out the information on the left side.
Kit Details
- Name is the name of the kit
- Description is the kit description. This is not a required parameter
- Icon URL is the URL for the kit image show in the UI grid. This is not a required parameter
- Permission is used to restrict usage of this kit to only players with the specified permission. The permission should be prefixed with 'kits.' (example 'kits.awesomekit').
- Auth Level is used to restrict usage of this kit to players with at least the specified auth level (0 is player, 1 is moderator, 2 is admin)
- Is Hidden is a toggle field. When enabled this kit will not be visible in the kit grid to regular players
- Maximum Uses is used to specify a maximum number of times a player can claim this kit per wipe cycle
- Cooldown is the amount of time in seconds the player must wait before being able to claim this kit again
- Purchase Cost is used to force players to pay to claim the kit. The currency type is defined in the config
- File Name is the file name of the desired CopyPaste file. If provided, when the player claims this kit it will attempt to spawn the specified copypaste file
Autokits
Autokits are kits that are given to a player when they respawn after dying.What kits are included are to be specified in the config file under "Autokits ordered by priority" by using the kits name
The plugin will loop through each kit specified in the config until it can give one to the player.
These auto-kits adhere to the same redeem rules as claiming them manually so they will be subject to things like Maximum Uses and Cooldown time
Here is a example of the formatting used in the config
NPC Kits
The plugin support claiming kits through NPC vendors from the HumanNPC plugin.Each NPC can be configured with different kits, and when the player interacts with the NPC the kit menu is presented to them with the kits specified in the config
The example in the config shows how to set this up.
You can specify which kits are available through the NPC, and a chat based response when interacting with them
The first parameter is the NPCs user ID
